Hands on with the jQuery UI widget factory

The plan

  • jQuery Plugin review
  • Widget factory advantages
  • Use cases and examples
http://www.flickr.com/photos/jdhancock/5845280258/
Notes
  • Regardless of whether we are using web frameworks with server-side rendering, or if we are writing fat clients in the browser for our rest back-end, javascript is the lingua franca of the web and the vehicle for providing users with a rich user experience.
  • In this talk we will look at encapsulating the client behaviours in our applications as widgets that we can share across our applications and with other users.
  • We’ll start by looking at the familiar jQuery plugin pattern and discuss some use cases where jQuery plugins fall short.
  • We’ll then see how the jquery widget factory helps us overcome those shortcomings.
  • Finally we’ll do a deep-dive into an example widget and learn the widget factory conventions that help us keep our code clean and concise.

Who am I?

http://leslycorazon.wikispaces.com/file/detail/head-silhouette-with-question-mark.png/319199232
  • Brian Leathem
  • Software Engineer @ Red Hat
  • RichFaces project lead (JSF)
  • RichWidgets — http://richwidgets.io
Notes
  • My own experience with the widget factory comes from the work we’ve done in developing RichFaces 5
  • Our goal with RichFaces 5 is to re-develop the front end of our JSF components as standalone javascript widgets that can be used either independently or backed by any web framework in any language
  • We created the richwidgets subproject to move that effort forward, and we chose the jquery ui widget factory as the vehicle for our implementation

Who are you?

http://openclipart.org/detail/crowd-by-kattekrab
Notes
  • And how about you guys, lets’ get an idea of the audience we have here today.
  • Can I see a show of hands
    • from those in the audience who consider themselves proficient with javascript?
    • And how about those of you who are familiar with the jquery plugin pattern?

Tapping into the jQuery ecosystem

Notes
  • Great, with the introductions out of the way let’s dive into the good stuff

jQuery

Consistent cross browser API for:
  • DOM traversal
  • HTML Manipulation
  • Event handling
  • Animation
  • Ajax
http://brand.jquery.org/logos/
Notes
  • jQuery is a cross browser library providing a number of different functionalities.
  • Historically the cross-browser nature of the library has been important, but as the browsers converge on the html 5 standard the browser differences are finally starting to disappear.
  • jQuery however continues to play an important role in providing a consistent API for manipulating the DOM
  • The importance of this consistent API should not be overlooked when you are considering whether to include jQuery in your app.

jQuery API

$('some-selector').method(parameters);

Example methods:
  • addClass / removeClass / css
  • html / text
  • on / off
  • animate
Notes
  • This code sample demonstrates the typical jQuery API pattern that we will want to match with our widget API
  • The $ sign represents the jQuery function object, and it’s invoked on a css selector that returns us a list of DOM nodes.
  • We can then invoke a method on that list of nodes, with an optional set of parameters, where those parameters oftentimes include callbacks
  • And these methods typically return the list of nodes on which they are invoked, making them chainable
  • This is the pattern we see whether we are manipulating the DOM, dealing with events, animating our page, or even issuing AJAX requests

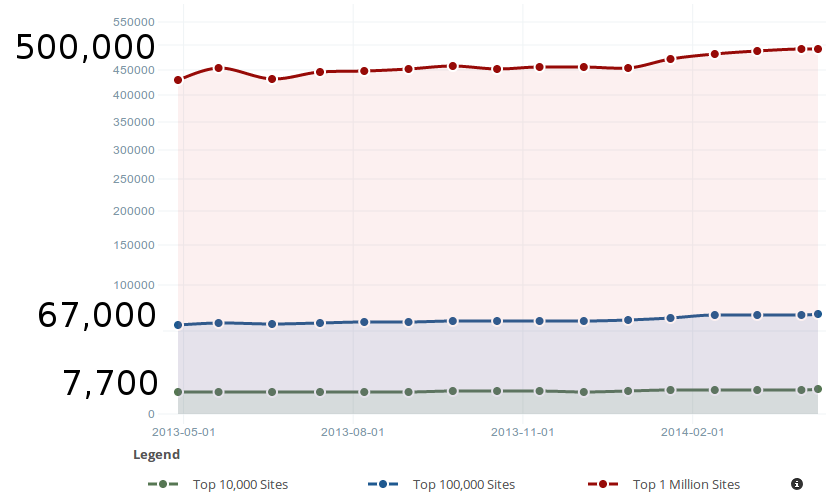
jQuery Ubiquity

jquery usage
Notes
  • Many people have caught on to how great it is to work with jQuery.
  • Out of the top 1 million sites, almost half of them are using jQuery.
  • Looking at the top 10 thousand sites, more than 3 quarters of them are using jQuery.
  • These numbers then should give us confidence in jQuery as our target
  • Kris Borchers (Executive Director of the jQuery Foundation) will talk tomorrow to learn more about the jQuery ecosystem

jQuery Plugins

  • Extend jQuery with custom functionality
  • Easy way to share code
<html>
  <p>Some text in a document</p>
</html>

...

<script>
  $('p').myplugin();
</script>
Notes
  • jQuery plugins provide the means to tap into the jQuery ecosystem with custom functionality unique to our use cases
  • When we create a plugin we are extending jQuery’s prototype object with a new method, making it available to all jQuery nodes
  • De-facto standard, providing a module system for sharing code between projects

A simple plugin

(function( $ ) {
 $.fn.myplugin = function() {
  return this.each(function() {
   $(this)
    .addClass("some-class")
    .css("color", "red");
   });
 };
})( jQuery );
Notes
  • We have here before us a simple jquery plugin
  • It consists of a function assignment into the jQuery object
    • where that function provides the desired functionality
  • In case you are unfamiliar with the syntax, I will point out the outer surrounding function declaration which is not unique to jQuery plugins. It’s simply an auto-executing function that immediately evaluates providing a closure in which the code is executed outside of the global namespace.
    • You’ll see this pattern recurring throughout this talk

Use cases

Well suited to use cases where plugin execution
results in some intended side-effect:

  • Text manipulation
  • Animation
  • Layout
Notes
  • jQuery plugins execute once, either on page load, or in response to some event.
  • On their own this makes them useful for use cases where we want to execute the plugin and have some desired side-effect
  • There are however a number of uses cases that the jQuery plugin mechanism doesn’t cover out-of-the box

A Stateful Widget

  • The active tab is the widget state
  • Use the javascript API to cycle the active tab

Instantiate the widget as a jQuery plugin:

$( "#tabs" ).tabs(); 

Query the active tab using the active option:

jQuery('#tabs')
  .tabs('option', 'active');

Set the active tab with the same active option:

jQuery('#tabs')
  .tabs('option', 'active', value);
Notes
  • Consider for example this tab widget from the jQuery UI widget factory.
  • It is a good example of what we’ll call a stateful widget
  • As we interact with the widget, it has to track which tab is active.
  • Additionally it provides an API for interacting with the widget.

Stateful plugins

  • Track & query state
  • Mutate options
  • Plugin interactions
  • Reverse DOM changes
  • Notify event listeners

Widgets

Notes
  • Plugins on their own then aren’t sufficient for providing stateful plugins
  • Some uses cases where the plugins fall short include the ability to
    • Track & query state
    • Mutate options
    • Plugin interactions
    • Reverse DOM changes
    • Notify event listeners
  • This isn’t to say one can’t write a jQuery plugins that provides these capabilities
    • The plugin mechanism is incredibly flexible, allowing us to solve this problem in our own way

Widgets with OOP

( function( $ ) {
  function MyWidget( element ) {
    this.init( element );
  }
  MyWidget.prototype.init = ...
  MyWidget.prototype.destroy = ...
  MyWidget.prototype.addListener = ...
  MyWidget.prototype.removeListener = ...
  MyWidget.prototype.setOption = ...

  ...
Notes
  • For example, we can use an object-oriented approach to track state and provide an API
  • Here we define a javascript prototype object that we will use to track state
  • We can define in this prototype all the functionality we are looking for, from lifecyle methods, to listener tracking, and option manipulation

OOP Plugins

( function( $ ) {
  ...

  $.fn.mywidget = function() {
    return this.each( function() {
      $.data( this, "mywidget", new MyWidget( this ) );
    });
  };
})( jQuery );
Notes
  • Our jQuery plugin definition will then create an object using that prototype function for each jquery node on which it’s invoked
  • We can store that object in the DOM for later retrieval using the jQuery data function

Widget API with OOP

Interact with the widget via an API:

$(document).ready( function() {
  var widget = $( "#foo" ).mywidget().data( "mywidget" );
  widget.doSomething();
});
Notes
  • When we later want to interact with the widget, we can retrieve it from the DOM and invoke methods on it
  • In this code sample we’ve retrieved the widget using the jQuery data function, and invoked the doSomething method

OOP → Boilerplate!

Encapsulate the boilerplate code in a common prototype function:

( function( $ ) {
  MyWidget.prototype = ...
  $.extend(MyWidget.prototype, myPrototype);
})(jQuery);

OOP Advantages

  • Object instance
  • API for interactions
  • D.R.Y. w/ a Shared prototype
Notes
  • So this is great, we’ve managed to create a stateful jQuery plugin
  • We can track the state of the widget in the object instance
  • We can interact with the widget via the object API
  • We can even stay dry by creating a common base prototype for all our widgets, encapsulating the common functionality

OOP Dis-advantages

  • Custom prototype maintenance
  • Non-standard API
    • events
    • mutable options
Notes
  • However this approach does have it’s drawbacks
  • If we go the shared prototype route we alone are responsible for maintaining that prototype
  • Anyone who want to consume or enhance our widget has to learn the idiosyncrasies unique to our approach and the custom API’s we’ve developed for common concerns like event handlers, and mutating options

jQuery UI Widget Factory

Notes
  • This conveniently brings us to the jQuery UI widget factory.
  • The widget factory provides this shared prototype.

jQuery UI widget factory

  • Track & query state
  • Mutate options
  • Widget interactions
  • Reverse DOM changes
  • Notify event listeners
Consistent
API
Notes
  • The widget factory provides all the concerns we were looking to resolve, but does so while providing a consistent API
  • This not only makes it easier for users to consume our widget, but also makes it easier for those looking to maintain or extend our widget in the future

Stopwatch example

jQuery('#timer').stopwatch();
http://www.flickr.com/photos/26782864@N00/3297205226/
Notes
  • We’ll spend the rest of the talk diving into our sample widget - a "stopwatch" widget.
  • Notice however that the widget follows the jQuery plugin pattern.
  • Here we can see the invocation of the widget against the results of a jQuery selector

window.setInterval

Calls a function or executes a code snippet repeatedly, with a fixed time delay between each call to that function.

window.setInterval( callback, interval );
Notes
  • The mechanism of the widget itself is the least interesting part of the widget
  • The widget simply uses the setInterval javascript method to invoke a callback in a repeating interval
  • The callback updates the DOM showing the progress of the timer

Stopwatch example

5

Notes
  • In it’s simplest form the stopwatch widget behaves very much like a jquery plugin.
  • In this example I’ve bound the plugin execution to this html button
  • When I click the button, the plugin executes, and initiates the countdown timer
  • Let’s next look at some of the richness that is exposed by implementing this plugin as a widget

Stopwatch example

5
Notes
  • The stopwatch widget API provides the ability to start, pause, resume, stop and reset the widget
  • Additionally I’ve provided the widget with some callbacks allowing my application to respond to state changes of the widget
    • You can see the result of this as the background color changes
  • Additionally the widget lifecycle is exposed via it’s API.
    • We can destroy the widget, and have it clean up any DOM changes it introduced
    • This demo also shows how we can disable the widget, preventing any further user interaction until it’s re-enabled

Widget Factory Deep Dive

(function($) {
  $.widget("rich.stopwatch", {
    /** prototype object **/
  });
})(jQuery);
http://commons.wikimedia.org/wiki/File:Thunderbird_assembly_line.jpg
Notes
  • With that demo in mind, let’s dive into the implementation of this widget and learn from it’s implementation
  • I mentioned earlier how the jQuery UI widget factory provides a shared prototype for our widgets
  • This prototype manages the lifecycle of our widget, and takes care of many of the base concerns in a "convention over configuration" style that keeps our widget code clean and concise
  • As a widget developer then, out only responsibility is to provide the widget factory with a prototype object used to extend the shared prototype with our custom functionality.
  • The widget factory will then take care of creating the jQuery plugin and managing our object instances
  • In this code snippet you can see the widget definition, where we invoke the widget factory widget function with 2 parameters:
    • the namespaced name of our widget - this name will be used to create the jquery plugin
    • the prototype object unique to our particular widget

Anatomy of a widget

( function( $ ) {
  $.widget( "rich.stopwatch", {
    options: { ... }
    doSomething: function() {
      // public methods have no "_" prefix
    },
    _helper: function() {
      // private methods have an "_" prefix
    }
  });
})( jQuery );
Notes
  • The structure of the prototype is roughly as follows:
  • We have an options property that defines the default option values.
    • the user provided options are automatically merged with the defaults, we don’t have to do this step ourselves
  • The prototype has a number of function properties that follow the naming convention of using a underscore prefix to mark methods as private

Default Options

( function( $ ) {
  $.widget( "rich.stopwatch", {

    options: {
      autostart: true,
      direction: 'decreasing',
      increment: 100 // in milliseconds
    },
    ...
  });
})( jQuery );
Notes
  • Setting the default option values for the widget is pretty trivial
  • in our stopwatch widget we have:
    • an autostart option that controls whether the countdown should start when the plugin is executed
    • a direction option that controls whether the timer counts up or down
    • and an increment option that controls the frequency at which the timer is updated

Widget API

Invoking the public methods:

$('#timer').stopwatch('doSomething', 'optionalParam');

// or

var widget = $('#timer').data('richStopwatch');
widget.doSomething();
Notes
  • We have a couple of options on how we can access the public API of the widget:
    • We can use the jQuery syntax, invoking the plugin with two parameters:
      • the name of the method
      • any optional parameter for the method
    • The advantage of this approach is we can chain the methods calls to other jQuery calls
    • Alternatively we can grab the widget object from the DOM and execute the methods directly

Invoking Methods

Private methods are accessible:

var widget = $('#timer').data('richStopwatch');
widget._helper();

Accessible private methods helps with widget extension

Notes
  • It’s important to note however that private methods are also accessible via the widget object
  • This came as a surprise to me when I first learned about the widget factory
  • But it turns out to be really useful when extending other widgets.
    • Forcing proper encapsulation would be be far too limiting

Lifecycle and callbacks

http://openclipart.org/detail/171954/cycle-color-by-karthikeyan-171954
  • _create / _destroy
  • disable / enable
  • _setOption
  • _trigger
Notes
  • The widget factory manages the lifecyle of our widget
  • It provides some callbacks and methods to let us tap into that lifecyle
  • Let’s look into some of these in detail

Widget Initialisation

Optionally override the _create method

  • Apply DOM changes
  • Register event listeners
  • create event fired implicitly
Notes
  • When the widget is initialized, the widget factory will invoke the _create method of your widget
  • this is where you want to put all the initialisation code for your widget including:
    • applying any DOM changes
    • Registering event listeners
  • After the widget is created, the widget factory fires the create event implicitly

Create

_create: function() {
  this.digitsElement = this.element.find('.digits');
  this.startTime = this.digits();
  this.digits(this.startTime);
  if (this.options.showProgressBar) {
    this._addProgressBar();
  }
  if (this.options.autostart) {
    this._createInterval();
  }
},
Notes
  • In our create event we:
    • find the DOM element holding the number we want to increment
    • store the initial time of our timer
    • re-format the start time with a call to the digits setter
    • Check if we should show a progressbar element
    • Finally check if we should start the timer on startup

Widget Clean Up

http://openclipart.org/detail/90451/keep-tidy-outside-01-by-anonymous
  • Leave the DOM as you found it
  • Remove any event handlers
  • Remove any timers/intervals
Notes
  • Another important callback in the widget lifecycle is the _destroy callback.
  • the widget factory invokes this widget method when the widget is being destroyed
  • This can happen as the result of an explicit destroy call like we saw in our demo
  • or it can be called implicitly when the widget’s DOM element if being removed from the DOM.
  • either way it’s our responsibility yo make sure our widget cleans up after itself
  • This usually involves:
    • Removing any DOM changes applied by the widget
    • Cleaning up any event handlers
    • and in our case removing any timers and intervals

Destroy!

_destroy: function() {
  this._removeInterval();
  if (this.progressBar) {
    this.progressBar.parents('.progress').first().remove();
  }
  this.digitsElement.text(this.startTime);
  this._trigger('destroy', undefined, this._dumpUi());
}
Notes
  • In our widget, the destroy callback
    • removes the interval and the progressbar if it’s present
    • resets the time back to it’s initial value
    • Triggers a destroy event for the widget consumer to listen for
      • We’ll talk more about events shortly

Enable / Disable

$.widget = {  // the jQuery UI widget object
  ...
  enable: function() {
    return this._setOptions({ disabled: false });
  },

  disable: function() {
    return this._setOptions({ disabled: true });
  },

}
Notes
  • Enabling/disabling the widget is handled a bit differently from creating and destroying
  • Taking a peak into the jQuery UI widget factory code we can see that the enable and disable public methods are already created for us, and they simply delegate to option mutation via the _setOptions method
  • So let’s take a look next at how we can mutate our widget options

Mutable Options

The widget Factory provides the option method for getting/setting the initialisation options

$('#timer').stopwatch('option', 'showProgressBar', false);

Hook in via the _setOption method if required

Notes
  • the widget factory provides out-of-the box the ability to mutate the option values used to initialize the widget
  • Some options have an implicit effect, eg. increment and no action on our part is required
    • The option value is used directly, so changing it’s value has an immediate effect
  • For other options some explicit action is required, for example the showProgressBar option
    • For these options we will want to hook into the option update and take any appropriate actions
    • this is achieved using the _setOption callback

Mutable Options

_setOption: function (key, value) {
  var widget = this;
  if (this.options.key === value) {
    return;
  }
  switch (key) {
    ...
  }
  this._super(key, value);
},
Notes
  • The typical pattern used in implementing the _setOption method is to use a switch statement to correctly act on the option update correctly

Mutable Options

case 'disabled':
  if (value === true) widget._disable();
  else widget._enable();
  break;
case 'showProgressBar':
  if (value === true && !widget.progressBar) {
    widget._addProgressBar();
  } else if (value === false && widget.progressBar) {
    widget._removeProgressBar();
  }
  break;
Notes
  • In our stopwatch widget we handle the
    • disabled option by delegating to some custom _enable and _disable methods
    • showProgressBar by invoking the method to show/hide the progressbar

Events & Callbacks

  • Events allow for object extension
  • Callbacks provided as either:
    1. plugin options
    2. event listeners
http://openclipart.org/detail/181653/new-years-party-by-liftarn-181653
Notes
  • Events are important to a widget to allow applications to tap into the widget and respond to internal state changes
  • Fortunately the widget factory makes it easy for users to register callbacks for our events
  • Callback can either be provided as options to the widget, or as event listeners

Callbacks as options

Option name matches the event name:

var options = {
  ...

  create: function(event, ui) {
    ui.element.css('background-color', ready);
    ui.element.css('color', 'white');
  }
Notes
  • When callbacks are passed as an option to the widget, the convention is the option name should match the event name
  • In our demo for instance, we provided a create callback to update the background color
  • Looking closely at the callback function you will notice two parameters:
    • The expected event object - this is the DOM event which triggered the event (if applicable)
    • The second parameter is the ui object - it represents the state of the widget at the time the event is fired
      • We’ll come back to this ui parameter in a moment

Callbacks as event listeners

jQuery event is prefixed with the event name

$('#timer').on('stopwatchcreate'), function(event, ui) {
  ui.element.css('background-color', ready);
  ui.element.css('color', 'white');
});
Notes
  • First let’s look at responding to widget events as standard jQuery event listeners
  • Here we are using the jQuery on method to listen for the stopwatchcreate event
  • The event is a concatenation of the widget name with the event name, all in lower case
    • One can override this prefix using the widgetEventPrefix property of the widget

Triggering events

Triggering events couldn’t be any easier:

this._trigger('eventname', event, ui);
Function Parameters:
  • event usually propagates an observed event
  • ui is an object that shares widget states
Notes
  • Triggering events from within your widget is also really easy.
  • Simply invoke the widget’s _trigger method with the event and ui parameters to fire an event and trigger the callbacks
  • I’ll also mention that it’s good practice to consider checking the disabled state before triggering your events

The UI parameter

Consolidate ui object creation in a method

_dumpUi: function() {
  return {
    element: this.element,
    digits: this.digits()
  };
},
Notes
  • Now let’s come back to that ui parameter.
  • In our stopwatch widget we’ve consolidated the ui object creation to a private method
    • This ensures the ui object is always received in a consistent format
  • You can see our ui object includes a convenience reference to the DOM element as well as the current time of the countdown timer

A note on styling

Adopting the jQuery UI widget factory does not tie you to the jQuery UI themes.

Examples in this demo were styled with:

Notes
  • This takes us through our discussion of the stopwatch widget implementation.
  • I want point out that using the jQuery UI widget factory does not tie you to the rest of the jQuery UI widgets
  • nor does it require you to use the jQuery UI approach to themes
  • The widget we looked at today for instance was styled using Bootstrap and less.
    • Both great tools which I could spend another hour talking about

Testing and Docs

Notes
  • We’ll wrap thing up with a brief discussion of some non functional concerns for our widget
  • testing and docs

Testing

Notes
  • There are lots of tools available out there for testing your widgets
  • In the work we did on the richwidgets project we settles on the following tools:
    • Jasmine is a behavior-driven development framework for testing JavaScript code
    • Jasmine-jquery provides an API for handling HTML, CSS, and JSON fixtures in your specs
    • Karma is the test runner, it controls the browser and executes the tests

Jasmine Example

describe("The 'toBe' matcher compares with ===", function() {
  it("and has a positive case ", function() {
      expect(true).toBe(true);
    });
  it("and can have a negative case", function() {
      expect(false).not.toBe(true);
    });
});
Notes
  • Here is an example of a simple test taken from the jasmine site
  • you can see how Jasmine provides an API vocabulary for writing fluent tests

More on testing

Tomorrow at DevNation:

Mobile web development: workflow and best practices - Lukas Fryc (Room 208)

Testing in richwidgets:

Notes
  • Testing of javascript code is a huge topic, and I am by no means doing it justice. I encourage you to attend
  • Lukas’ presentation tomorrow where he will be discussing javascript testing and tooling

API docs

YUIDoc can be used to provide generated API documentation

options: {
  /**
   * Whether to start the stopwatch on plugin execution
   *
   * @property autostart
   * @type Boolean
   * @default true
   */
  autostart: true,
Notes
  • Docs have a similar story to testing, with a number of solutions available
  • With the long Java background that I have, I am quite partial to the javadoc approach for documenting APIs in place
  • For this reason we settled on the YUIdoc approach for documenting the richwidgets project
  • you can see here the comment block on our option with some annotations describing the meta-characteristics
  • This same pattern is applied to methods and events

Stopwatch API docs

Notes
  • Let’s take a look at the generated API docs for our stopwatch widget

Stopwatch example

Notes

We’ll wrap things up now with a final look at the widget code all put together

/**
 * A stopwatch widget
 *
 * @module Output
 * @class chart
 */
(function ($) {

  $.widget('rich.stopwatch', {

    options: {
      autostart: true,
      direction: 'decreasing',
      disabled: false,
      showProgressBar: true,
      increment: 100 // in milliseconds
    },

    _create: function() {
      this.digitsElement = this.element.find('.digits');
      this.startTime = this.digits();
      this.digits(this.startTime);
      if (this.options.autostart) {
        this._createInterval();
      }
      if (this.options.showProgressBar) {
        this._addProgressBar();
      }
    },

    start: function() {
      if (this.isRunning()) {
        return;
      }
      this.reset();
      this._createInterval();
    },

    resume: function() {
      this._createInterval();
    },

    pause: function() {
      this._removeInterval();
    },

    stop: function() {
      this.digits(0);
      this._removeInterval();
    },

    reset: function() {
      if (this.options.disabled) {
        return;
      }
      this._removeInterval();
      this.digits(this.startTime);
      this._trigger('reset', undefined, this._dumpUi());
    },

    isRunning: function() {
      return !!this.intervalId;
    },

    digits: function(value) {
      if (typeof value === 'undefined') {
        return parseFloat(this.digitsElement.text());
      } else if (! this.options.disabled) {
        if (value <= 0) {
          value = 0;
        }
        this.digitsElement.text(value.toFixed(2));
        this._updateProgressBar();
      }
    },

    _createInterval: function() {
      if (!this.intervalId && !this.options.disabled) {
        this.intervalId = setInterval($.proxy(this._decrementCount, this), this.options.increment);
        this._trigger('start', undefined, this._dumpUi());
      }
    },

    _removeInterval: function() {
      if (this.intervalId && !this.options.disabled) {
        clearInterval(this.intervalId);
        this.intervalId = null;
        this._trigger('stop', undefined, this._dumpUi());
      }
    },

    _decrementCount: function() {
      var delta = this.options.increment/1000;
      var time = this.options.direction === 'increasing' ?
        this.digits() + delta : this.digits() - delta;
      this.digits(time);
      if (time <= 0) {
        this._removeInterval();
      }
    },

    _addProgressBar: function() {
      if (this.options.direction === 'increasing') {
        return;
      }
      this.progressBar = $('<div class="progress-bar" style="width: 0%;" />');
      var progress = $('<div class="progress" />').append(this.progressBar);
      this._updateProgressBar();
      this.element.append(progress);
    },

    _removeProgressBar: function() {
      if (this.progressBar) {
        this.progressBar.parents('.progress').first().remove();
        this.progressBar = null;
      }
    },

    _updateProgressBar: function() {
      if (! this.progressBar) {
        return;
      }
      var value = 100 - (this.digits() / this.startTime * 100);
      this.progressBar.css('width', value.toFixed(4) + '%');
    },

    _disable: function () {
      this._removeInterval();
      this.element.addClass('disabled');
    },

    _enable: function () {
      this.element.removeClass('disabled');
    },

    _dumpUi: function() {
      return {
        element: this.element,
        digits: this.digits()
      };
    },

    _getCreateEventData: function() {
      // called when the widget factory fires its create event
      return this._dumpUi();
    },

    _setOption: function (key, value) {
      var widget = this;
      if (this.options.key === value) {
        return;
      }
      switch (key) {
        case 'disabled':
          if (value === true) {
            widget._disable();
          } else {
            widget._enable();
          }
          break;
        case 'showProgressBar':
          if (value === true && !widget.progressBar) {
            widget._addProgressBar();
          } else if (value === false && widget.progressBar) {
            widget._removeProgressBar();
          }
          break;
      }
      this._super(key, value);
    },

    _destroy: function() {
      this._removeInterval();
      this._removeProgressBar();
      this.digitsElement.text(this.startTime);
      this._trigger('destroy', undefined, this._dumpUi());
    }

  });
}(jQuery) );

Credits

Creative Commons Licence
Hands on with the jQuery UI widget factory by Brian Leathem is licensed under a Creative Commons Attribution-NonCommercial 4.0 International License.
Based on a work at https://github.com/bleathem/talks/.

Learn More on jQuery UI